Technical Slop
Navigation
Displace
Considerations
Solid
Channels
Circle Grads
Gradients
PSD
Curve It
Tweakables
Scans
Broken China
Bulge
Math 1
Math 2
Heat Waves
Reflection Maps
Power Distort
Other
Cannify
Extrude
Whispies
AMP
Brush Making
Picking Colours
13 Revisited
Levels
Pixel Shuffle
UVW 2
Pui Pui
Light Rig
ChannelsThis is a discussion that I have been avoiding for a long time. Why? Because it's a bitch to explain. The beginning part is easy, but explaining the difference between a one-channel and a two-channel D-Map is a real brain boggler. For this discussion, I actually did something that I hardly ever do: I took notes. Gads! Not only that, but I actually took the time to use PS for diagrams instead of just scanning my notes. Major gads! What's up with that? I'm also doing things slightly out of order. This is a real tough call. Once I get finished with this and a few other things, I think I'll be rearranging some of the discussions. Have to wait and see how things develop. In the mean time, read on. |
|
If you look at the separate RGB channels, you should be able to see how they make a composite. There are all sorts of things you can do with Channels. Get to know them! Lucky for you our only interest right now is how Displace uses Channels. Let's talk about that and things. |
|
At the top of this graphic is a one channel D-Map. Displace will treat is as such. One channel D-Map have a slightly different set of rules from a two channel D-Map. Even if the D-Map is Greyscale, like this one, as soon as another channel is available, it becomes a two channel D-Map. Spiffy. Now, when dealing with other Modes, like RGB, the first two channels are all that Displace cares about. In an RGB doc, Red is the first channel and Green is the second channel. The same is true for CMYK, basically. Here's the rub: if the first two channels are identical, then it will act exactly like a one channel D-Map. This is a handly little thing to know and I might expand on this later. (I might even tell you about some of my vicious lies.)
|
|
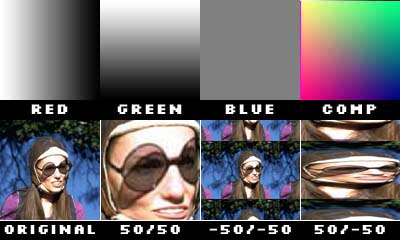
Because any PSD made in any mode with two channels is a two channel D-Map, I sometimes present my D-Maps like this. It's an RGB with good stuff in the first two channels (Red and Green). This is my prefered method of making D-Maps. I fill the Blue channel with 50% Grey because it makes it easier for me to visually evaluate a D-Map. I've been making D-Maps this way for so long, I can get a pretty good idea what a D-Map will do if made this way just by looking at the composite. I don't know if that's a good thing or not. |
|
Okay, so a one channel and a two channel D-Map work differently. What exactly is the difference? Let's start off by looking at the Grabitude of a one channel D-Map.
Here is one such example. Looking at the diagram can explain it better than I can with words. If you would like some more details on the ratio and line factoring, read Math1 and/or Math 2. |
|
While a one channel D-Map has it's uses, it is limited to that line for Grabitude. Not really that great for most things. The playing field is pretty narrow. |
|
Again, diagram over words. Until I can articulate, it will have to do. The playing field just got bigger, exciting, and more useful. Yes! I did want to put a few more red dots with their values in there, but the math was killing me. I'm so lazy. |
|
So, what are we left with? A few confusing diagrams, I'ld wager. Actually, I think the biggest boon in this discussion is that it shows the relationships between percentages, pixels, and brightness values in the D-Map. At the very least, the difference between one channel and two channel D-Maps, even if not understood explicitly. I'ld settle for that. Still, I have to try with some visual examples. Please continue to Page 2.
|
|
Page 1 - 2
|
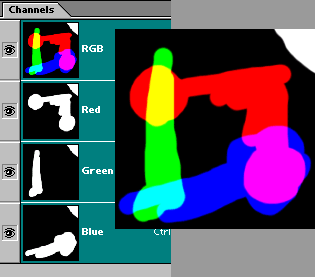 So
it all begins with Channels. Here is a real cheap example of Channels
in RGB mode. Just a doodle, really. Seriously.
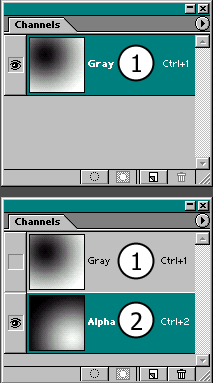 Displace
only cares about the first two channels in any doc. Period. All other
channels are superfluous. Period. You can toss as many Alpha channels
as you want into a doc, but Displace will only look at the first two (if
more than one exists).
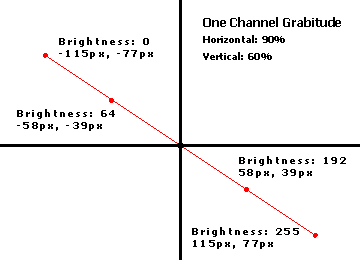 Let's
say you have a one channel D-Map and you enter Horizontal: 90% and Vertical:
60%. The percentages describe a line in pixels based on the ratio 100%
/ 128px. Then, the brightness values in the D-Map tell Displace where
on the line to grab values from in the target.
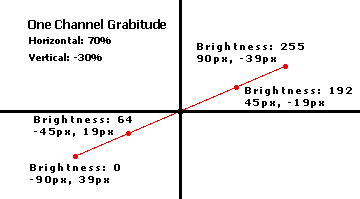 Here
is another such example.
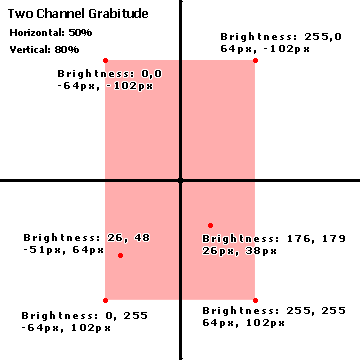 Here
we have a two channel D-Map with Horizontal: 50% and Vertical: 80%. In
a two channel D-Map, the percentages describe a rectangle for Grabitude.
Displace then looks at the brightness values of the first two channels
for Grabitude.