Technical Slop
Navigation
Displace
Considerations
Solid
Channels
Circle Grads
Gradients
PSD
Curve It
Tweakables
Scans
Broken China
Bulge
Math 1
Math 2
Heat Waves
Reflection Maps
Power Distort
Other
Cannify
Extrude
Whispies
AMP
Brush Making
Picking Colours
13 Revisited
Levels
Pixel Shuffle
UVW 2
Pui Pui
Light Rig
SolidSo many things go into using Displace. Almost too many things to make it understandable. But that is a part of what makes Displace so powerful -- all those options. Right now, don't worry too much about all those things. Just worry about positive and negative values entered into the Displace dialoge box, and what the DMap looks like. Right now, the DMap is just a White square in a Gray border (you'll see).
|
 This
is the coordinate system used for Displace. It's an old throw-back, but
it's still with us. Because we read from left to right, top down, the zero
on our monitors is in the upper-left hand corner. Might be slightly disorienting
at first to some (like math majors), but it will pass as you work with this
system more. This
is the coordinate system used for Displace. It's an old throw-back, but
it's still with us. Because we read from left to right, top down, the zero
on our monitors is in the upper-left hand corner. Might be slightly disorienting
at first to some (like math majors), but it will pass as you work with this
system more. |
|
Meet Biker Chic. Don't ask because I don't know. She's just one of those things with me. She is what we will be experimenting with. See that yellow border around her? That's a part of the image. It's to help show what's going on when we use her for Displacing. |
|
See? A White square in a Gray border. What does it do to Biker Chic? First we'll try a positive percentage for Horizontal Displacement. |
|
What happened was Displace looked at the White in DMap and grabbed pixels appropriately. It grabbed from the right. That's what White does in a DMap with a positive percentage in the Horizontal.
|
|
The D-Map is overlayed the picture of Biker Chic (using Stretch to Fit). First, it checks the value of a pixel in the D-Map (in this case, the upper-right of the White square). Then it grabs a certain distance based on the brightness value of that particular pixel in the D-Map. Then it grabs that pixel from the picture and pulls it onto itself -- in the picture itself.. Jeez. Hopefully the graphic to the left explains this better than I can verbally. |
|
It grabs from the left. (No more big graphics like above.) So, White grabs from the right with a positive value and White grabs from the left with a negative value. Okay, that's just Horizontal. What about Vertical? Glad you asked. |
|
Can you guess what a negative value does? |
|
Okay, so that was a lot fun -- boring, but fun. Nothing like playing with just one percentage at a time to get the feel for Displace. Ready for some reverse-ngineering with our plain DMap? By that I mean taking our current DMap and getting to do what we want it to do. What we want it to do now is take the upper-right hand corner and place it in the middle. We want to grab from above and to the right. That means that the Horizontal percentage is positive and our Vertical percentage is negative. Right? |
|
So, what does this mean? It means that we can use the same DMap to grab from anywhere within Biker Chic just by using positive/negative values for Horizontal and Vertical. |

 This
is our first DMap. Pretty plain, isn't it? Don't fret --things will get
complicated down the road. For now, simple is good. And this is a one
channel PSD. A Greyscale doc.
This
is our first DMap. Pretty plain, isn't it? Don't fret --things will get
complicated down the road. For now, simple is good. And this is a one
channel PSD. A Greyscale doc. See
what happened? See the yellow line that was grabbed from the right border
and her face was moved over with it?
See
what happened? See the yellow line that was grabbed from the right border
and her face was moved over with it? Okay.
Let's look at that in a little bit more detail. Sounds good to me.
Okay.
Let's look at that in a little bit more detail. Sounds good to me. What
does a negative value do?
What
does a negative value do? Heh.
White grabs from below with a positive Vertical percentage.
Heh.
White grabs from below with a positive Vertical percentage. Did
you guess right? I hope so.
Did
you guess right? I hope so.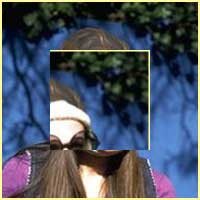 Yep.
That did the trick.
Yep.
That did the trick.