Technical Slop
Navigation
Displace
Considerations
Solid
Channels
Circle Grads
Gradients
PSD
Curve It
Tweakables
Scans
Broken China
Bulge
Math 1
Math 2
Heat Waves
Reflection Maps
Power Distort
Other
Cannify
Extrude
Whispies
AMP
Brush Making
Picking Colours
13 Revisited
Levels
Pixel Shuffle
UVW 2
Pui Pui
Light Rig
Broken ChinaDrop a plate and it shatters. Pieces and shards everywhere. Sure, easy to do in PS with the Polygon Lasso Tool. But where's the Displace edification in that? Bah! Let's use Displace. |
|
|
|
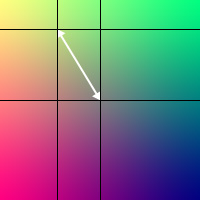
Anybody remember that? Probably not. But that doens't matter. What this shows is what I call the Zoom Cube. See how it magnifies with positive values? Pretty neat, I think. It can also do a few other things. If you want to see some really cool things with the Zoom Cube, make you own and use values over 100%. Ohhh... ahhh... But our interest in the Zoom Cube isn't in how the gradient work in a dmap. Our interest is using it for a reference point on how solid colours in a dmap work. |
|
|
|
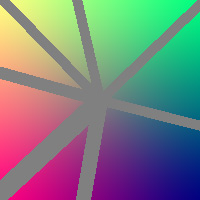
Now it's time to meet our Alpha channel with the pieces in it. These pieces are a quick hack using the Line Tool with some various widths. You will need this in the dmap and in the picture to be displaced. Not too tough to do with a quick C&P. This is a quick hack. I have a better method, but this will do for this example. |
|
One thing a lot of people don't really take advantage of is the fact that a dmap is a PSD. Layer it up, folks! Don't be shy. It's a PSD, so treat it as such. Got your Zoom Cube all set? Good. New Layer and use the Alpha to fill with 50% Gray. |
|
You will really want to zoom in for this, but my clipboard and PS don't get along. This graphic will have to do. You want to use the Eyedropper to select the Zoom Cube colour at the tip of the piece/shard. Then fill in the corresponding transparent region. Man, I hope that makes sens |
|
|
|
|
|
|
|
|
 Meet
Bikerchic. She's a lot of fun to play with. A long time ago I introduced
her in a few examples that I had whipped out.
Meet
Bikerchic. She's a lot of fun to play with. A long time ago I introduced
her in a few examples that I had whipped out.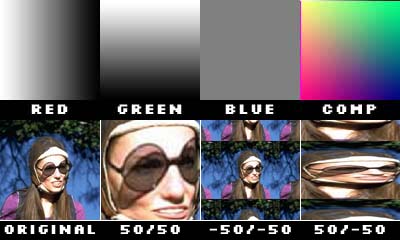
 Yeah,
that's more like it. What we are interested in is the relationship between
the center of the Zoom Cube (50% Gray) and any given colour around it.
You see, a dmap with a solid colour does an offset. And that offset is
directly related to that colour's position in the Zoom Cube as it relates
to the center. Kai explains this and the math so much better than I can
as of this writing.
Yeah,
that's more like it. What we are interested in is the relationship between
the center of the Zoom Cube (50% Gray) and any given colour around it.
You see, a dmap with a solid colour does an offset. And that offset is
directly related to that colour's position in the Zoom Cube as it relates
to the center. Kai explains this and the math so much better than I can
as of this writing.

 There.
All done with this part. Save it and we are almost finished with this
little project.
There.
All done with this part. Save it and we are almost finished with this
little project.  Now
it's time to Displace away. I started with 100/100, but it looked funny.
So I tried it with a few other values. I finally settled on 90/90. With
the Alpha channel, it's easy to clear out the area that wasn't diplaced.
Now
it's time to Displace away. I started with 100/100, but it looked funny.
So I tried it with a few other values. I finally settled on 90/90. With
the Alpha channel, it's easy to clear out the area that wasn't diplaced. Just
for fun, I pieced it back together by hand. I went to the Alpha channel,
used the Magic Wand to select a single piece, then moved it right on the
layer.
Just
for fun, I pieced it back together by hand. I went to the Alpha channel,
used the Magic Wand to select a single piece, then moved it right on the
layer.