Technical Slop
Navigation
Displace
Considerations
Solid
Channels
Circle Grads
Gradients
PSD
Curve It
Tweakables
Scans
Broken China
Bulge
Math 1
Math 2
Heat Waves
Reflection Maps
Power Distort
Other
Cannify
Extrude
Whispies
AMP
Brush Making
Picking Colours
13 Revisited
Levels
Pixel Shuffle
UVW 2
Pui Pui
Light Rig
Cannify BasicA very long time ago, I was new to Adobe Photoshop. Hours and hours getting to know it. I remember very clearly, one fine spring day, setting a goal for myself. That goal was to be able to use Displace to warp a texture to a cylinder. After several years, it finally happened. Long road. But... I'm going to show how to accomplish wrapping a texture to a cylinder using Shear and Spherize as the main tools. It's some what quick, and it works fairly well.
|
|
Since Shear works horizontally and I want to cannify him vertically, we'll have to Rotate Canvas 90° -- in this case 90° CW. |
|
Using those guides, we'll need two Alpha channels. |
|
|
|
|
|
Go to the texture/picture Layer, load Alpha 1, and run Filter > Distort > Shear. (Since we are using Alpha channels, I turned the guides off.) |
|
Keep Alpha 1 loaded and run Filter > Distort > Spherize. |
|
1.) The Mode is Vertical only. Look at the bottom of the Sherize dialog for the pull-down menu. 2.) Shear then Spherize. Yes, the order is important. Hmm... I'll try and expound on this later. For now, try flipping the order around and see what happens. |
|
So, how do we go about cleaning it up? Well... remember Alpha 2? |
|
Right. Time to Rotate Canvas 90° CCW and finish it up. |
|
Load Alpha 2, Invert Selection, Delete. For most applications, that's nearly it. All that's really left is Blending mode, Free Transform, extra layers for highlights/shadows, whatever. As an added bonus, I went ahead and did some extra Alpha operations for the top of the can. |
|
Well, that was fun. Now, if you know your way around, you should be able to come up with a short-cut or two in the above. Around 2 weeks after I wrote it, I realized that some of the Alpha work wasn't exactly necessary. Live and learn. Ready to move on and see what happens when we use some Displace? You knew I was going to do this with Displace, didn't you?
|
 This
is our subject. I don't know who he is, but I'm going to cannify him in
the name of edification regardless of identity. Isn't that nice of me?
This
is our subject. I don't know who he is, but I'm going to cannify him in
the name of edification regardless of identity. Isn't that nice of me?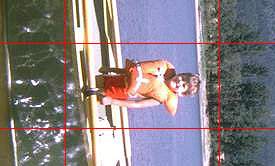 Not
only rotated, but four guides have been placed that mark the boundaries
of what is to be cannified.
Not
only rotated, but four guides have been placed that mark the boundaries
of what is to be cannified. Alpha
1 is like so. The white on the left and right is to give us some room
to play with.
Alpha
1 is like so. The white on the left and right is to give us some room
to play with. And
we have Alpha 2 like so. We'll be using this later for clean-up. Operating
in tandem has benefits.
And
we have Alpha 2 like so. We'll be using this later for clean-up. Operating
in tandem has benefits.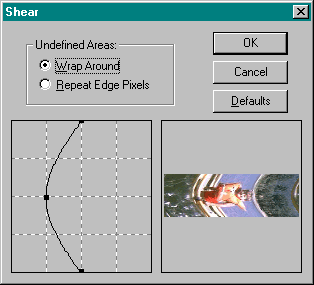 Now
that the prep-work is done, time to get busy bending and shaping.
Now
that the prep-work is done, time to get busy bending and shaping.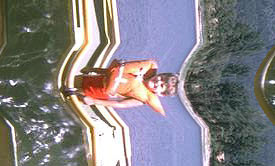 Looks
pretty good, but don't celebrate yet.
Looks
pretty good, but don't celebrate yet.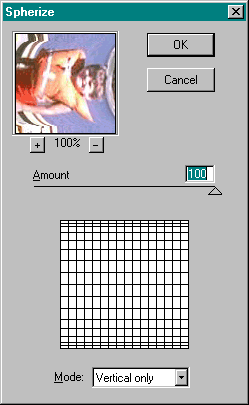 Okay,
there are two major things to notice here.
Okay,
there are two major things to notice here.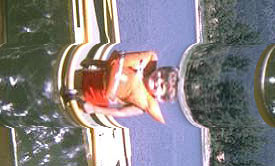 Oh,
now that looks good.
Oh,
now that looks good. Go
to Alpha 2, make sure Alpha 1 is loaded as a selection, then Shear and
Spherize. The settings for both filter should still be fresh in PS's memory,
so use them.
Go
to Alpha 2, make sure Alpha 1 is loaded as a selection, then Shear and
Spherize. The settings for both filter should still be fresh in PS's memory,
so use them.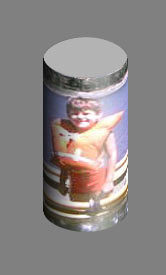 The
rest is basically basic operations.
The
rest is basically basic operations.