Technical Slop
Navigation
Displace
Considerations
Solid
Channels
Circle Grads
Gradients
PSD
Curve It
Tweakables
Scans
Broken China
Bulge
Math 1
Math 2
Heat Waves
Reflection Maps
Power Distort
Other
Cannify
Extrude
Whispies
AMP
Brush Making
Picking Colours
13 Revisited
Levels
Pixel Shuffle
UVW 2
Pui Pui
Light Rig
ExtrudeA basic extrusion of text, but almost anything will do. This is my version. Yippie. Bit of a long way, but it works for shapes with fancy curves and what-not. |
|
Started with a Black background. White text one top of that. Then I copied the Text Layer and Rasterized it. Finally, I hid the original Text Layer. Fairly standard procedure. I also checked Preserve Transparency on the Rasterized Layer -- just in case. Now, select the Layer's transparency (ctrl + click) and save it in an Alpha channel. It should look just like the above. Now we'll be working with Alpha channels. I just love working with Alpha channels and then moving to the Layers palette to put it all together. Copy this new Alpha channel and we'll really get to work. |
|
Angle: 30° Tada! Note the Angle and Height. Remembering the Angle used is more important than remembering the Height. If I told you why, I'd have to kill you. Okay, here's the deal with the angle. See the white? That's going to be the direction of the extrude. That's going to be the direction that things go back towards. It's going to be at 210° (30° + 180° = 210°). The white resulting from Emboss is the base for extruding the graphic. Now, let's run Image > Adjust > Levels (ctrl + l). Now things are going to get a bit tricky again. Why? Because I said so. Okay, mainly because I don't have a graphic for this part. PS and my clipboard don't always get along, so I'll have to rely on pure text for this bit. Okay, we've got this Alpha channel with bunches of Black and some funky White specks that slightly resembles text. Remember our original Alpha channel? Good. Load it as a selection (ctrl + click), then Select > Inverse (ctrl + shift + i). Now let's run some Filter > Blur > Motion Blur. Use the same angle as what you used in Emboss (30°), and eyeball the Distance. I used 10, but you can use more. But you don't want to get too crazy with the Distance because it could wreak havoc on the next step. This is done with an inverted selection so things don't get blown through the text. Things get really funky if that happens. You could end up with an extrude that goes all over the place. This keeps it neat and on the side of the text that we want it to be on.
|
|
Normally I would Threshold, but I'm in the mood for Levels. |
|
If you don't think this will be enough extrusion, do the last few steps again. Load original Alpha again (ctrl + click), Select > Inverse (ctrl + shift + i), Filter > Blur > Motion Blur, Image > Adjust Levels (ctrl + l). As long as you think you've got enough. Let's move on. Remember our original Alpha channel? Good. Copy it again. We will be doing another Emboss. |
|
Notice that the only setting that I changed is the angle. It's at -90° of 30°. Get it? But this is rather arbitrary. What this step does is set the base for the highlights and shadows for our extruded graphic. Okay. Now it's time to move on to Layers palette and start putting it all together.
|
|
|
|
|
|
Then go to Layer 3, the clipped Hard Light Layer, and do lots of fun stuff. I ran Motion Blur a few times using 30° (Can you figure out why?). I also ran Image > Adjust > Curves to tone the White down a bit. I used Input 255 / Output 190 and fiddled from there. That means I grabbed the upper-right, top of the line, and dragged it straight down, then tweaked from there. I also turned off Preserve Transparency of some of the Layers and Gaussed ever so slightly. Then I turned Preserve Transparency back on -- just in case. Now, you might think that the way I put it together is a bit odd. But it allows for a lot of tweaking. I mean, you can change the colours very easily by picking a colour and filling (with alt + backspace for the foreground colour). And the shading can be tweaking on the Hard Light Layer with Curves or Levels or what have you. It's a tweak-meisters dream. That's pretty much it, but there is one more thing I want to mention. Remember earlier when I mentioned running Motion Blur and Levels more than once for more of an extrusion? Well, if you do that, then you'll have to do something about Layer 3 (the Hard Light Layer). The way to fix this is with Motion Blur followed by Curves (or Levels), but I'll leave it to you to figure out exactly what I mean. Enjoy. |
 Here
we go. This is our graphic that will be extruding. Could probably stand
to be cropped on the bottom a bit, but I'm not gonna do it.
Here
we go. This is our graphic that will be extruding. Could probably stand
to be cropped on the bottom a bit, but I'm not gonna do it. First
thing to do is Emboss.
First
thing to do is Emboss. You
should now have something like this. Feel free to Deselect (ctrl + d)
at any time.
You
should now have something like this. Feel free to Deselect (ctrl + d)
at any time. Something
like that. Levels allows good control over artifacts and the jagginess
of it. You will want to keep the control points to the far left -- as
far left as you care to go. We want nice and fat without artifacts.
Something
like that. Levels allows good control over artifacts and the jagginess
of it. You will want to keep the control points to the far left -- as
far left as you care to go. We want nice and fat without artifacts. Angle:
-60°
Angle:
-60°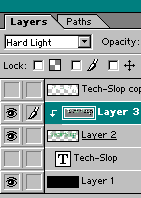 This
is how I've set it all up.
This
is how I've set it all up. Should
look something like that. Pretty nasty, eh? The main reason it looks so
nasty is because the very top Layer, Tech-Slop copy 1, is turned off.
Should
look something like that. Pretty nasty, eh? The main reason it looks so
nasty is because the very top Layer, Tech-Slop copy 1, is turned off. So,
turn the top Layer on and give it a colour. Again, I used light green.
So,
turn the top Layer on and give it a colour. Again, I used light green.