Technical Slop
Navigation
Displace
Considerations
Solid
Channels
Circle Grads
Gradients
PSD
Curve It
Tweakables
Scans
Broken China
Bulge
Math 1
Math 2
Heat Waves
Reflection Maps
Power Distort
Other
Cannify
Extrude
Whispies
AMP
Brush Making
Picking Colours
13 Revisited
Levels
Pixel Shuffle
UVW 2
Pui Pui
Light Rig
|
First there were Layerd D-Maps. Then I got to playing with gradients. When I understood gradients, my productivity exploded. While gradients are good, they are still linear, so to speak. Even if you fiddle with the mid-points in the grad, they are still linear. Because of this, I felt like something was still missing. I was pulling some pretty humerous things to get what I wanted. Even with all of the tricks that I had learned, I still had one last wall to break through. One day it came. It was definitely one of my bigger epiphanies. It hit me real hard after I had read Curves by Steve. At last I had the final piece to a massive puzzle. I could now sculpt with complete control and intent. What is about to follow is the foundation for some of my favorite, "advanced" D-Map making tricks. I will be going quite a bit faster than usual. Hopefully I have laid down enough of a foundation for you to understand the little, explicit things that I'm leaving out. Curve It SkewWe've got PSD files for D-Maps! Woo! So far it has just been a little taste of what can be done with extra Layers tossed into the D-Map. Now it's time to get a little beefy. Curves, when applied to a gradient, is very cool. Let's take a romp with skewing. |
|
|
|
Save it as PSD and let's get to work. |
|
The White down the middle of the D-Map grabs pixels from 64px straight down. Then Grabitude lessens to 0px as it gets to the edges. Do you see what I mean about gradients being linear? Should be perfectly straight lines, but they aren't and I have no idea why. |
|
Save it again as a PSD (again), and let's see what it does. |
|
That was fun. Let's try a variation. |
|
|
|
|
|
What's so cool about this variation is that you can do it with almost any profile. If you can make a curve in the Curves Ad-Layer, then you can bend a target to that curve. Very major spiffy. |
|
That was fun, but not really anything that can't be done with Shear. So, what's the point? Concept, you fool! Edification and undestanding.
|
|
|
|
Several examples of Curving the new D-Map is below with only horizontal Displacement. The first one is the D-Map with no Curving -- it's all straight lines. The second one, the one in the middle, is a "lazy s" Curve. The linearness of the first one is all gone. The last one is a random doodle in the Curves Ad-Layer. Very cool.
|
 |
|
Not exactly anything that can't be accomplished with Shear and some creative butchering. The main thing is that you are now aware of how to do such things with Displace.
|
|
Page 1 - 2
|
 Biker
Chic. Note the differences in this version. It just helps illustrate.
Biker
Chic. Note the differences in this version. It just helps illustrate. This
is our first D-Map. White down the center and 50% Grey down the sides.
Basic gradient work. Shouldn't be too hard to build.
This
is our first D-Map. White down the center and 50% Grey down the sides.
Basic gradient work. Shouldn't be too hard to build. This
is what the D-Map does to Biker Chic with 50% vertical.
This
is what the D-Map does to Biker Chic with 50% vertical.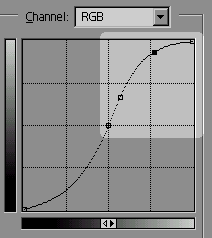 Back
to the D-Map to add an Adjustment Layer. This is a Curves Ad-Layer. Since
there are no values below 128 in the D-Map, only the highlighted part
will affect the D-Map.
Back
to the D-Map to add an Adjustment Layer. This is a Curves Ad-Layer. Since
there are no values below 128 in the D-Map, only the highlighted part
will affect the D-Map. Woo!
Look at that! Linear be gone! Major spiffy.
Woo!
Look at that! Linear be gone! Major spiffy. This
is the base for our next D-Map. You doknow what it does, don't you?
This
is the base for our next D-Map. You doknow what it does, don't you? Add
a Curves Ad-Layer and make it like so. Save it as a PSD and let's check
it out.
Add
a Curves Ad-Layer and make it like so. Save it as a PSD and let's check
it out. Oh
man! Once again, linear be gone!
Oh
man! Once again, linear be gone! This
is our next D-Map. Across the top is a field of black. Across the bottom
is a field of white. In the middle is a gradient linking the two. Not
terribly difficult to build.
This
is our next D-Map. Across the top is a field of black. Across the bottom
is a field of white. In the middle is a gradient linking the two. Not
terribly difficult to build.